A friend at work was talking about things that she would have in her dream house, and I said that if she loved the house she was in, she should put those things into her current house... and live the dream. I might have over-simplified the idea, but everything's possible at some level.
Anyways.... this applies to our little house. It's perfect for us, but it needed some dream items. One was my craft room (done!), another thing was a huge walk in closet (done!)... and now we're on to something more adventurous - the Music Room. The room where our "secret" project is being done.
Again, it's not an actual secret, but it's an item that falls in the secret category. I think nearly every little kid dreams of having a secret passageway in their house - well, every kid that reads adventure books :)
Because our staircase to upstairs goes through a bedroom, the room can't actually be used as a bedroom. SO, we're making it our Music Room... and taking the opportunity to create a secret passageway to our upstairs! I won't be able to explain it very well as an overall picture, so you'll just have to be patient while I outline the steps for you as we go.
Step 1 - Take the doorway apart
Last weekend, my Mum came out for a Lady-Do day, and although it took a little bit of convincing, I had her helping me take apart the door frame within an hour.
 |
| The start |
 |
| Door & hinges off |
 |
| Trim off |
We took our time with it, slowly peeled off the trim, being careful not to take apart the lathe/plaster underneath as best we could.
Et Voila! Step 1 done!
 |
4 layers of paint, one very well covered nail. See it there? |
 |
| That's better. |
 |
Oops, we should know better. Gloves and glasses thereafter! |
At the start, it looked like the trim was one whole piece (which is impossible). We later found that we couldn't see the edges because it was so well made, and so frequently painted.
Step 2 - Figure out the solution to the hinge problem.
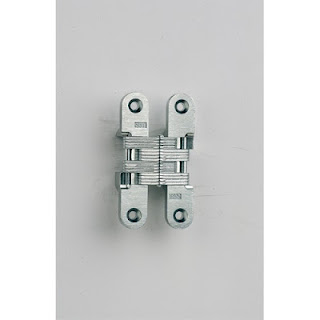
I want the door to open into the stairwell, which seems like no big deal, but when closed, it has to be flush with the wall inside the room. Using the frame as it sat, with the hinges already there (turning them around) would actually make the door sit about 1-2" too deep. Hmm. Setting the door so it's flush, means that the hinges wouldn't have anywhere to move (as the frame is 2x as deep as the door itself). Can you visualize the issue? I'd need a hinge that doesn't require any clearance at it's rotation point.
My Dad did some googling and found a blog of someone who makes hidden doors using invisible hinges. After reading his blog post and then going a few steps deeper myself, I managed to find a set of hinges that I hope will work. Are they available locally? Of course not, lol. BUT, I ordered them today from a company in the States and hopefully they'll work out.
They're called "invisible" hinges, as their rotation point is within themselves. The actual hinge, is inside the faceplate. Since neither of those were a great description, here are a couple of pictures:


I'm really dreading the day we try to put them on, although the shipping is supposed to take a week and a half so I can worry about that later. In the meantime, I'm going over and over and over my drawings for the variations of the next step: panelled trim work.
Once the door and panelling are done, then it's just painting and shopping left... and GW's space will be ready to enjoy!
Have you subscribed for easier updates yet?
Sign up on the right hand side, yup scroll up there, and I'll send you quick notes when a post is up!

Ah the dangers of creating a secret passageway!! You'll have to watch out for curious fawns in red scarves, too... but in the meantime that hinge is mighty slick. I still don't 'get' how it works but it looks exciting anyway! Looking forward to seeing the finished product :)
ReplyDeleteBut you won't see it! It's a secret...shhhhh!
ReplyDeleteTee hee... you two are funny :)
ReplyDelete